

Activities of this lab:
- understand the main items of a graphical interface.
- learn how to use
tkinterto create graphical interfaces in Python. - enrich the graphical interface of
PistusResawith a login window.
Introduction
The Graphical User Interface (GUI) allows any PistusResa user to access all the application functionalities in an easy and intuitive way.
Several libraries, known as widget toolkits, exist to program a GUI in Python. For this tutorial, we choose Tkinter, which is built on top of the Tcl/Tk widget toolkit, for two reasons:
- It is the standard built-in Python GUI library.
- As opposed to other libraries, it is easy to learn.
As a downside, the interfaces programmed with Tkinter look a bit rudimentary. However, if we need to quickly develop simple interfaces, Tkinter is an excellent choice.
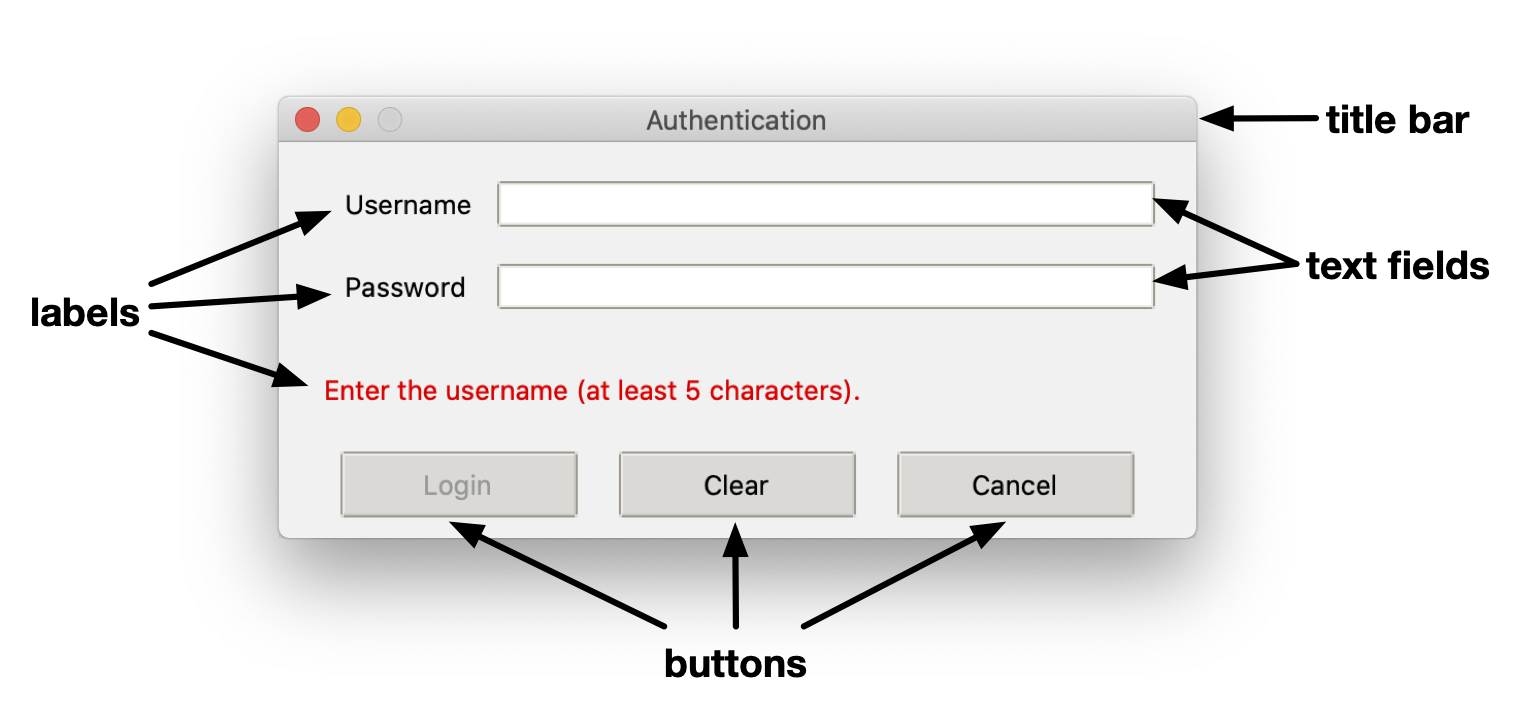
The following figure shows the PistusResa login window. The main elements of a GUI are:
- Window, that is a container that includes all the other GUI elements, usually referred to as widgets.
- Title bar: where the title of the window appears.
- Text fields: where users can enter some text.
- Labels: used to explain the function of other widgets.
- Buttons: used by users to trigger a reaction.
These widgets are usually not added to the window directly; instead, they are grouped into frames. In the figure there are three frames (invisible in the figure):
- the first frame includes the Username and Password labels and text fields;
- the second includes the message label (Enter the username (at least 5 characters));
- the third includes the buttons.
The advantage of using frames is that we can arrange widgets with different criteria, as we'll see below.
The
PistusResa login window
Most of the PistusResa GUI is already implemented. Your objective today is to add a login window, as the one shown in the figure.
The GUI playground
In the first part of this lab, you'll learn how to use tkinter.
⏰ Time to spend in this part: at most 1 hour.
👉 Continue reading on this page.
The login window
You're now ready to create the login window.
It is important to understand how the application PistusResa is executed in the first place.
The entry point of the application is file pistus.py.
Try to run file pistus.py in Visual Studio Code.
If you get errors when you execute the file through the Visual Studio Code execution button, you should open a terminal and type: py -m pistus (Windows) or python3 -m pistus (macOS). This will ensure that all the imports in all files will work.
👉👉WARNING: If you get an error AttributeError: module 'PIL.Image' has no attribute 'ANTIALIAS', then open file gui_config.py and change Image.ANTIALIAS with Image.LANCZOS at line 18👈👈
When you execute pistus.py, the following instructions are executed (read the code to identify these actions):
- Load the application configuration from file
./config/config. - Load the messages bundle in the language specified in the configuration. The messages bundle contains the text associated to the widgets.
- Connect to the database, of which the file path is specified in the configuration file.
- If authorization is enabled in the configuration file,
PistusResacalls the functionopen_login_window()defined in file./gui/login.py. - If authorization is not enabled, the main window of the application pops up.
- Whenever the user closes the application main window,
PistusResacloses the connection to the database and stops its execution.
👉 If you look at the configuration file, authorization is enabled. However, if you run the file pistus.py right now, no window will appear because the login window is not implemented yet.
The login window GUI
You'll now create the widgets of the login window.
Open file ./gui/login.py and go to function open_login_window().
This function is called when PistusResa is executed and authentication is enabled. The function creates the GUI of the window. In particular, it calls the three following functions:
_credentials_frm_widgets(). Creates the frame containing the text fields to enter username and password._message_frm_widgets(). Creates the frame containing a label used to show messages to the user (e.g., "incorrect password")._buttons_frm_widgets(). Creates the frame containing the buttons.
👉 Your job is to implement these three functions. For each function:
- Read the comments in the code to understand what to do.
- The variables for the text fields, labels and buttons are already defined at the beginning of the function. Use these variables and don't change their name.
- Write the code where indicated (after the phrase "TODO").
Complete the implementation of function _credentials_frm_widgets().
👉 At the end of the function, the text fields that you create are added to a global variable text_fields, a dictionary. Remember this, as you'll need to use this global variable later when adding callbacks to your widgets.
ANSWER ELEMENTS
    ttk.Label(credentials_frm, text = username_lbl_text)\
        .grid(row=0, column=0, padx=10, pady=10, sticky = "w")

    # Adds the text field "username"
    username_tf_content = tk.StringVar(value="")
    username_tf = ttk.Entry(credentials_frm, textvariable=username_tf_content)
    username_tf.grid(row = 0, column = 1, sticky='ew')

    # Adds the label "password".
    ttk.Label(credentials_frm, text = password_lbl_text)\
        .grid(row = 1, padx=10,pady=10, column = 0, sticky = "W")

    # Adds the text field "password".
    password_tf_content = tk.StringVar(value="")
    password_tf = ttk.Entry(credentials_frm, show='*', \
                            textvariable=password_tf_content)
    password_tf.grid(row = 1, column = 1, sticky='ew')

    # The text fields will span the entire column.
    credentials_frm.columnconfigure(1, weight=1)
Complete the implementation of function _message_frm_widgets().
👉 At the end of the function, the labels that you create are added to a global variable control_labels, a dictionary. Remember this, as you'll need to use this global variable later when adding callbacks to your widgets.
ANSWER ELEMENTS
    message_lbl = ttk.Label(message_frm, style="Check.TLabel")
    message_lbl.grid(row=0, column=0, sticky='ew')
Complete the implementation of function _buttons_frm_widgets().
👉 At the end of the function, the buttons that you create are added to a global variable buttons, a dictionary. Remember this, as you'll need to use this global variable later when adding callbacks to your widgets.
Event handling
The following automaton shows how the login window changes as a result of the user's actions on its widgets.

Do you need a textual description of the automaton? Click here
- Initially, the window is in the INIT state. The
passwordtext field and the buttonloginare disabled; the control label shows the messagemessages_bundle["enter_username"]; - While the user types the username, the username is checked to verify that it meets certain validity criteria (
username_ok); if so (the password is not OK because the user hasn't typed anything yet), the window transitions to the USERNAME_ENTERED state; - In the USERNAME_ENTERED state, only the button
loginis disabled; the control label shows the messagemessages_bundle["enter_password"]; - If the user changes the username, and the username does not meet the validity constraint, the window transitions back to the INIT state;
- If the user types a password that meets certain validity criteria, the window transitions to the state CREDENTIALS_ENTERED; the message
messages_bundle["login_authorized"]is shown in the control label; - In the CREDENTIALS_ENTERED state, all fields are enabled, including the button
login; - If the user changes the password, and the password does not meet the validity criteria, the window transitions back to the state USERNAME_ENTERED;
- If the user changes the username, and the username does not meet the validity criteria, the window transitions back to the state INIT; the password text field will be disabled, but its current value is maintained;
- If the user changes the username, and both the username and the password meet the validity constraints, the window transitions directly to the state CREDENTIALS_ENTERED;
- If the user clicks the button
login, and the username and password are not correct, the window stays in the state CREDENTIALS_ENTERED and the messagemessages_bundle["username_not_found"]ormessages_bundle["incorrect_password"]is displayed in the control label; - If the user clicks the button
login, and the username and password are correct, the login window is destroyed and thePistusResamain window is opened;
In any state, if the user clicks the button clear, all fields are cleared and the window transitions back to the state INIT;
if the user clicks the button cancel, the login window is destroyed.
The following animation might help you understand the behaviour of the login window based on the user's actions.
Automaton implementation
You'll now implement the functions necessary to realize the behaviour described in the automaton discussed above.
👉 You'll find the functions to implement in file login.py.
Follow the instructions in the comments to implement the following functions:
init_state().username_entered_state().credentials_entered_state().username_updated().password_updated()
👉 Remember that the text fields, control label and the buttons are stored in the global variables text_fields, control_labels and buttons respectively.
👉 Don't forget to add the necessary instructions to function _credentials_frm_widgets() to associate the functions username_updated and password_updated as callbacks of the text fields username and password.
👉 Run pistus.py and verify that the window correctly changes state when you type the username and the password.
Warning. Even if username and password match all the validity criteria, you cannot log in to the application. You'll have to wait the next section.
ANSWER ELEMENTS
Function init_state:
    text_fields["username"][0].configure(state=["!disabled"])
    text_fields["password"][0].configure(state=["disabled"])
    buttons["login"].configure(state=["disabled"])
    control_labels["message_ctrl"].\
        configure(text=messages_bundle["enter_username"])
Function username_entered_state:
    text_fields["username"][0].configure(state=["!disabled"])
    text_fields["password"][0].configure(state=["!disabled"])
    buttons["login"].configure(state=["disabled"])
    control_labels["message_ctrl"].\
        configure(text=messages_bundle["enter_password"])
Function credentials_entered_state:
    text_fields["username"][0].configure(state=["!disabled"])
    text_fields["password"][0].configure(state=["!disabled"])
    buttons["login"].configure(state=["!disabled"])
    control_labels["message_ctrl"].configure(text=message)
Function username_updated:
    if utils.username_ok(get_username()):
        if not utils.password_ok(get_password()):
            username_entered_state()
        else:
            credentials_entered_state(messages_bundle["login_authorized"])
    else:
        init_state()
Function password_updated:
    if utils.password_ok(get_password()):
        if not utils.username_ok(get_username()):
            init_state()
        else:
            credentials_entered_state(messages_bundle["login_authorized"])
    else:
        if not utils.username_ok(get_username()):
            init_state()
        else:
            username_entered_state()
In function _credentials_frm_widgets we need to add the two following instructions in order to associated the two callbacks username_updated and password_updated to the text fields username and password.
username_tf_content.trace("w", username_updated)
password_tf_content.trace("w", password_updated)
Logging in
You'll now implement three functions that will let you finally log in to PistusResa.
👉 The username is admin and the password is Adm1n!
- Read the comments in file
login.pyto implement the functionslogin(),clear()andcancel(). - Add the necessary instructions to function
_buttons_frm_widgetsto associatelogin(),clear()andcancel()as callbacks of the buttonslogin,clearandcancelrespectively. - Run
pistus.pyto verify that you can successfully log in and open thePistusResamain window.
ANSWER ELEMENTS
Function login:
    if res[0]:
        window.destroy()
        open_main_window(cursor, conn, messages_bundle, lang)
    elif res[1] == auth.INCORRECT_PASSWORD:
        credentials_entered_state(messages_bundle["incorrect_password"])
    elif res[1] == auth.USERNAME_NOT_FOUND:
        credentials_entered_state(messages_bundle["username_not_found"])
Function clear:
    text_fields["username"][1].set("")
    text_fields["password"][1].set("")
Function cancel:
    clear()
    window.destroy()
In function _buttons_frm_widgets we need to add the argument command=login, command=clear and command=cancel when we create the login, clear and cancel buttons respectively.
The main window
If you could log in to PistusResa, you should see the application main window.
This window has a menu on the left with three options that let the users open windows to
add and edit student data and registrations.
👉 Play with the interface and verify that the functions that you coded in the Student module work correctly.
What's next? (Optional)
If you still have time, you can complete the application and implement the authentication and deadline module.